

Your property floods every time it rains hard. Water pools in your driveway, overwhelms your gutters, and turns your yard into a soggy mess. You’ve tried basic drainage fixes, but the water keeps coming back, and you’re tired of dealing with the same problem every storm season.
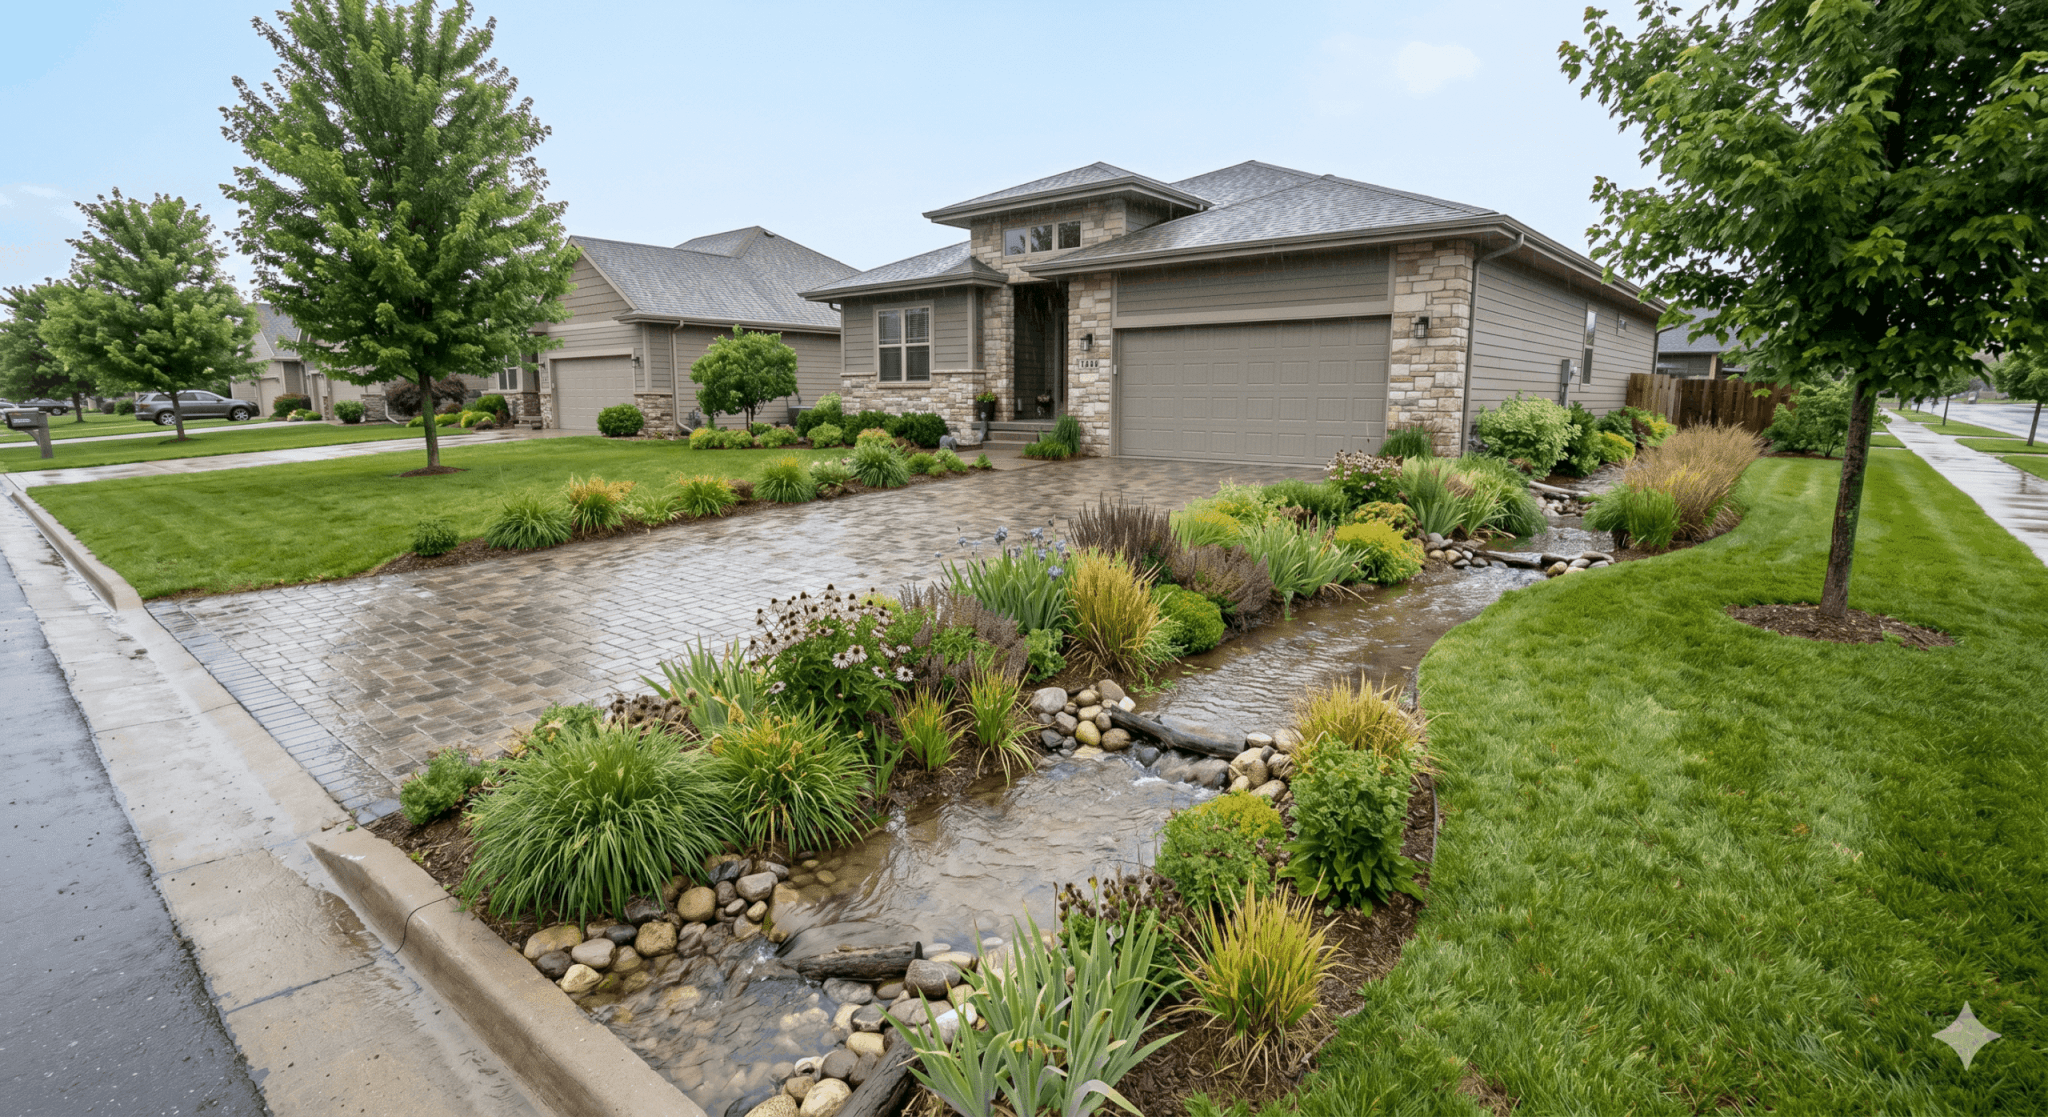
Bioretention manages stormwater runoff right on your property – no more watching water rush off into storm drains. It’s a shallow planted area with engineered soil that captures, filters, and slowly releases stormwater instead of letting it rush off your lot. Think of it as a low spot in your landscape that handles water naturally – reducing flooding, cleaning runoff, and adding green space that works.
Here’s how bioretention systems work, what they cost, and whether they’ll work on your property. You’ll see the key components, sizing rules, maintenance needs, real examples, and funding options that cut your upfront costs.
Key takeaways
- Budget $15-40 per square foot for installation: bioretention systems typically cost $3,000-8,000 for average residential projects, with government rebates covering 25-75% of expenses.
- Size your system at 5-10% of your roof area: a 2,000 square foot roof needs roughly 100-200 square feet of bioretention to capture the first inch of rainfall effectively.
- Get funding arranged before you start: Rainplan pays approved project costs upfront and connects you with vetted contractors who understand local incentive requirements and documentation.
- Choose the right system type for your soil: rain gardens work for well-draining soil, while bioretention cells with underdrains handle clay soil or high groundwater conditions.
- Plan for 1-2 year establishment period: new systems need weekly watering and regular weeding until plants mature, then become largely self-sustaining with minimal annual care.
What is bioretention and how does it work?
For linear drainage paths like driveways or property edges, bioswales for linear drainage areas serve a similar function without the excavation depth.
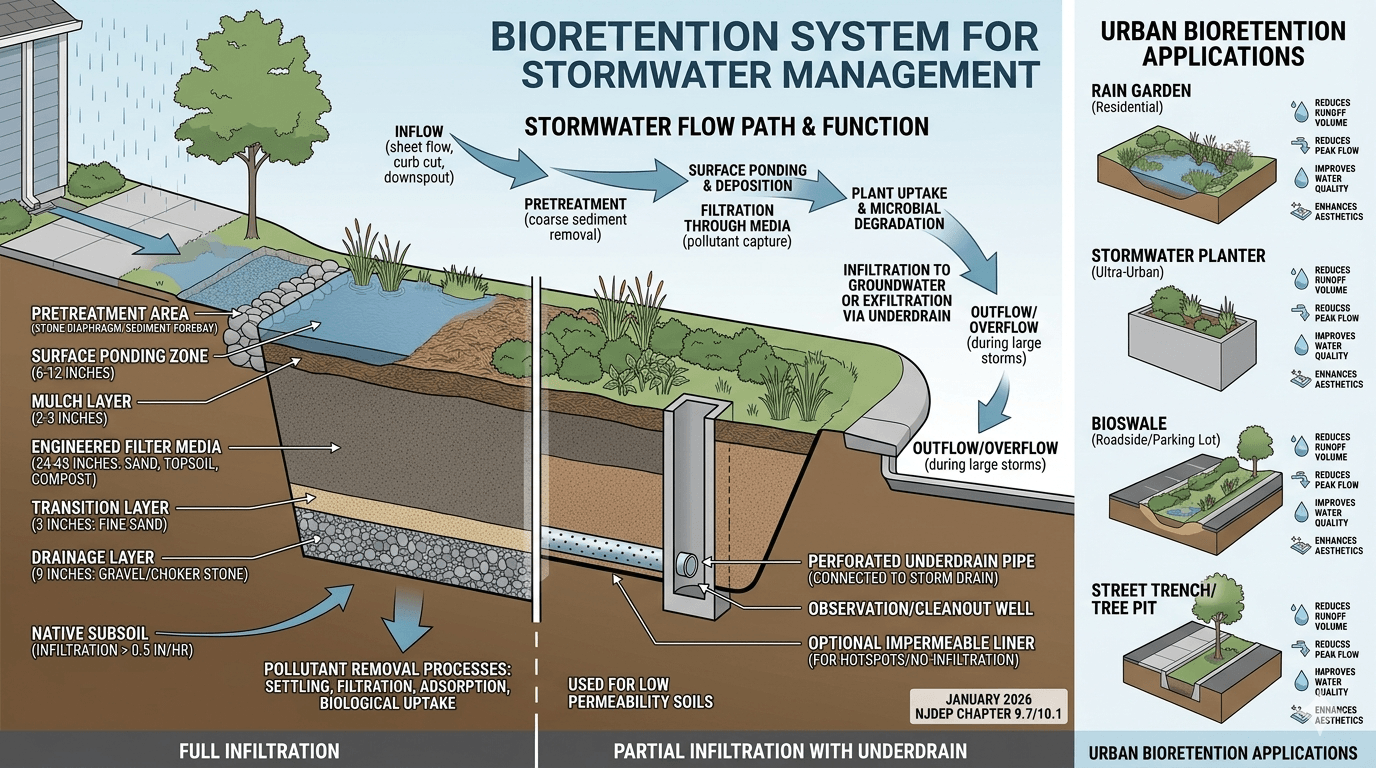
Bioretention is a shallow, vegetated depression with engineered soil that captures and treats stormwater runoff before it infiltrates into the ground or flows to storm drains. Think of it as nature’s water filter for your property. It removes pollutants through physical filtration, plant uptake, and microbial activity while reducing flooding and protecting local waterways.
Small residential systems are often called rain gardens, while larger engineered systems with underdrains go by bioretention cells or bioretention areas. The terminology gets confusing. Here’s what each term means:
- Rain garden: Small system (under 1,000 square feet), usually no underdrain, perfect for treating roof or driveway runoff
- Bioretention cell: Engineered media system, often includes underdrain, handles larger drainage areas
- Biofilter or stormwater planter: Urban-focused system, almost always underdrained, fits tight spaces
Knowing what bioretention does helps you decide if it fits your property. The system does three things to protect your property and community:
- Pollution removal: Filters out sediments, metals, oils, and nutrients before they reach storm drains and waterways
- Volume reduction: Captures runoff to reduce flooding, ponding, and erosion on your property
- Flow control: Slows stormwater discharge during storms, protecting downstream infrastructure and preventing overwhelmed storm systems
How bioretention removes pollutants from stormwater
Bioretention systems clean stormwater three ways. Each targets different contaminants, producing water that’s much cleaner than what runs off your roof or driveway. These processes show why proper design and installation matter for long-term performance.
Physical filtration through engineered media
The engineered soil mix traps suspended solids and particulate pollutants as water filters down. This media blend (typically 50% sand, 25% topsoil, and 25% organic matter) drains at 1 to 8 inches per hour. That rate treats the water without creating mosquito breeding pools.
You’ll see a 2-3 inch mulch layer on top that filters first. It catches larger debris and protects the soil below from compaction during storms. The media depth ranges from 18 to 30 inches depending on your local requirements and what pollutants you’re targeting.
Biological uptake and microbial transformation
Plants and soil microbes absorb nutrients like nitrogen and phosphorus that would otherwise fuel algae blooms in waterways. Plant roots open pathways for water while hosting bacteria that break down pollutants. The vegetation you choose needs to handle both wet and dry conditions since bioretention areas flood during storms and dry out between rains.
Native grasses, sedges, and wildflowers work particularly well. Their deep roots keep the soil structure intact and maintain drainage over time. Some systems add iron filings or other amendments to the media to increase phosphorus removal, especially near lakes or sensitive waterways.
Enhanced settling and temporary storage
The ponding area (that shallow depression you see after storms) lets heavier particles settle before water enters the soil media. This 6-12 inch deep zone gives biological and chemical processes time to work. Water typically pools for a few hours after small storms, then drains completely within 24-48 hours.
Adding an underdrain changes the water balance. The system shifts from soaking water into the ground to filtering and draining it away. Instead of soaking into native soil, treated water collects in perforated pipes and discharges to storm drains. You’ll need an underdrain if your soil drains slowly (less than 0.5 inches per hour), groundwater sits within 2 feet of the surface, or local regulations require specific drawdown times.
Find Rainwater Rebates in Your Area
Enter your address to see local rebates for rain barrels and green infrastructure. Many programs cover 50%+ of costs.
Essential components of a bioretention system
A bioretention system needs several components to work. Knowing these elements helps you evaluate contractor proposals and catch problems during installation. Each component plays a role in treating stormwater.
Engineered soil media specifications
The soil media determines your system’s performance. Quality control matters here. Contaminated or poorly mixed media leads to clogging, poor drainage, or nutrient leaching.
Here’s what to verify during delivery and installation:
- Sand content (50-60%): Provides structure and drainage capacity
- Topsoil (20-30%): Supports plant growth and microbial activity
- Organic matter (20-30%): Enhances pollutant removal and water retention
- Phosphorus index: Should test below 30 to prevent nutrient export
Place media in 6-inch lifts without excessive compaction. Over-compacting destroys the pore structure that allows infiltration and root growth. Rainplan connects you with contractors who know these specs and can get the right media for your area.
Overflow structures and underdrain systems
Every bioretention system needs an overflow route for big storms. This could be a notch in a berm, a concrete weir, or a catch basin with a grate. The overflow elevation sits 6-12 inches above the media surface, creating your ponding zone.
Underdrains use 4-6 inch perforated pipes surrounded by gravel at the bottom of the excavation. The pipes connect to your storm drain system or discharge to a safe outlet.
Consider an underdrain when facing these conditions:
- Clay soils: Native infiltration below 0.5 inches per hour
- High groundwater: Within 2 feet of the bottom
- Space constraints: Can’t achieve adequate separation from foundations
- Regulatory requirements: Specific drawdown times mandated
Plant selection and establishment
Vegetation does more than look nice. It maintains infiltration rates, removes nutrients, and signals system health. Select native plants that tolerate both flooding and drought. Mix grasses, wildflowers, and shrubs for year-round function and looks.
Common successful plants include switchgrass, black-eyed susans, cardinal flower, and buttonbush. Space plants according to their mature size, typically 12-18 inches apart for perennials. Add 2-3 inches of hardwood mulch after planting, but keep it away from plant stems to prevent rot.
7 steps to design and build bioretention
Building bioretention takes planning and precision. Larger systems need professional design, but knowing the process helps you evaluate proposals and talk with contractors. These steps cover installation from site assessment to final planting.
Step 1: Assess your site conditions
Start by checking if your property works for bioretention. This assessment shows whether bioretention works for you and what type of system you need.
Check these site factors before moving forward:
- Drainage area: Measure the impervious surfaces (roof, driveway, patio) that will drain to the bioretention area
- Available space: You’ll need 5-10% of the contributing impervious area for the bioretention footprint
- Slope: Sites with 1-5% slope work best; steeper sites need terracing
- Setbacks: Maintain 10 feet from foundations, 5 feet from property lines
- Soil infiltration: Test native soil drainage rate with a simple percolation test
- Utilities: Call 811 to locate underground lines before any digging
Red flags that rule out bioretention include contaminated soils, persistent standing water, bedrock within 4 feet, or mature trees you want to keep. Rainplan’s virtual site assessment spots these issues before you pay for detailed design.
Step 2: Size your bioretention area
Size your system based on your drainage area and local rainfall patterns. The typical sizing rule captures the first inch of rainfall from your impervious surfaces.
For a 2,000 square foot roof draining to bioretention, you’d need approximately 100-200 square feet of bioretention area. Local programs may have specific sizing requirements for incentive eligibility. Some require treating the 90th percentile storm event, others use volume-based calculations.
Step 3: Excavate and prepare the base
Excavation depth typically ranges from 2 to 4 feet total. This includes the ponding depth, media depth, and underdrain gravel if needed. Test the bottom for infiltration if you’re relying on native soil drainage.
Avoid over-compacting the bottom. Heavy equipment can seal off soil pores and prevent infiltration. If equipment access is tight, hand dig or use small machinery to preserve soil structure.
Step 4: Install underdrain if required
If your site needs an underdrain, install perforated pipes in 12 inches of clean gravel. Use 4-inch pipes for areas under 1,000 square feet and 6-inch for larger systems. Wrap pipes in filter fabric to keep fine particles from clogging them.
Connect underdrains to an approved discharge point: either your property’s storm drain connection or a stable outlet away from foundations. Include cleanouts for maintenance access.
5: Place engineered media
Install media in 6-inch lifts, lightly compacting just enough to prevent settling. Moisten each lift during placement, but don’t saturate it. Verify the mix meets specifications before accepting delivery. Contaminated media is expensive to remove and replace.
The final media surface should sit 6-12 inches below the overflow elevation to create your ponding zone. Grade the surface relatively flat with a slight depression toward the center.
Step 6: Plant and mulch
Plant during the dormant season (fall or early spring) for best establishment. Water plants immediately after installation and weekly during the first growing season if rainfall is insufficient.
Add 2-3 inches of shredded hardwood mulch, but avoid piling it around plant stems. The mulch layer filters runoff, blocks weeds, and keeps soil moist during establishment.
Step 7: Test and establish
Run water through the system to check drainage and overflow. Document the drawdown time. It should drain completely within 48 hours. Take photos for inspections or incentive program paperwork.
Plants need 1-2 growing seasons to mature. You’ll need to weed and water more often during this time. Once established, the system mostly takes care of itself.
Bioretention costs and financial considerations
Knowing bioretention costs helps you budget and find ways to cut expenses through design choices and incentives. Cost planning includes upfront installation and long-term maintenance.
Breaking down installation costs
Bioretention costs depend on size, site conditions, and local labor rates. Here’s how costs typically break down for a 200 square foot residential system:
- Excavation and disposal: $500-1,500 depending on access and disposal distance
- Engineered media: $600-1,200 for quality sand/soil/compost blend
- Plants and mulch: $300-600 for native plants at proper density
- Underdrain materials: $400-800 if required (pipes, gravel, fittings)
- Overflow structure: $200-500 for simple surface overflow
- Labor: $1,500-3,000 depending on complexity
- Design and permitting: $500-1,500 for professional plans if required
Expect to pay $15-40 per square foot for residential installations. Larger systems cost less per square foot.
Factors that affect pricing
Several factors affect costs. Knowing these helps you plan better:
- Site access: Tight spaces requiring hand digging cost more than open areas accessible by equipment
- Soil conditions: Rocky soil or high groundwater increases excavation difficulty
- Disposal distance: Hauling excavated soil farther increases costs significantly
- Plant selection: Native plants from local sources cost less than specialty varieties
- Retrofit vs new construction: Retrofits typically cost 20-30% more due to existing infrastructure constraints
Long-term maintenance expenses
Annual maintenance keeps your system working. Budget for these ongoing costs:
- Mulch replacement: $100-200 every 2-3 years
- Plant replacement: $50-150 annually for the first few years
- Sediment removal: $200-400 every 5-10 years from the forebay
- Media replacement: $1,000-2,000 every 15-20 years if clogging occurs
Proper maintenance extends system life and keeps it cleaning water effectively. Rainplan shows you upfront and ongoing costs, then connects you with contractors who price clearly.
Funding opportunities for bioretention projects
Financial assistance makes bioretention affordable. Many qualify for programs they don’t know exist, and combining multiple funding sources can cover most project costs. The right funding approach cuts your costs and gets you the most incentives.
Government rebate programs
Municipal and utility rebate programs vary by location but often cover 25-75% of costs. Common program structures include:
- Direct rebates: Fixed dollar amount per square foot of bioretention installed
- Cost-share programs: Percentage reimbursement up to a maximum amount
- Stormwater fee credits: Ongoing reductions in your stormwater utility bill
- Tax incentives: Property tax reductions or income tax credits for green infrastructure
Check with your local stormwater utility, conservation district, or environmental agency for programs. Application timing matters. Many programs require pre-approval before construction begins.
Stacking incentives effectively
You can often combine multiple funding sources to save more. You might combine a utility rebate, stormwater fee credit, and native plant grant. Know the program rules to avoid conflicts. Some programs reduce awards if you receive other funding, while others encourage stacking.
The pathway to funding typically follows these steps:
- Determine eligibility
- Submit applications with required documentation
- Receive pre-approval
- Complete installation
- Request inspection
- Receive payment
Document everything: before photos, receipts, plant lists, and as-built drawings.
Rainplan’s financing solutions
Rainplan pays approved project costs upfront and helps you find incentives. The platform finds funding sources for your project based on your address and details. This approach lets you move forward knowing the financing is set.
Through Rainplan’s network, you connect with qualified contractors who know local incentive requirements. They know what documentation you need for reimbursement and make sure your project meets program specs. This coordination between financing, incentives, and installation reduces the risk of costly mistakes.
Start your bioretention project with confidence
Bioretention works best as part of a broader stormwater management plan for your property that coordinates all drainage solutions across your lot.
Bioretention offers property owners a practical solution for managing stormwater while improving property value and environmental health. By understanding how these systems work, what they cost, and how to fund them, you can make informed decisions about implementing bioretention on your property.
The combination of pollution removal, flood reduction, and available financial incentives makes bioretention an increasingly attractive option for environmentally conscious property owners. With proper design and maintenance, these systems provide decades of reliable stormwater management while creating attractive landscape features.
Ready to explore bioretention for your property? Get Started with Rainplan to discover available incentives and connect with qualified contractors.
Frequently asked questions
What’s the difference between bioretention and a rain garden?
Rain gardens are essentially small-scale bioretention systems designed for residential use, typically under 1,000 square feet without underdrains, while bioretention cells are larger engineered systems that often include underdrains and handle more complex drainage patterns.
How much stormwater can a bioretention system handle?
A properly sized bioretention system captures and treats the first 1-1.5 inches of rainfall from its drainage area, which represents about 90% of annual rainfall events in most regions.
Do bioretention systems work in winter or cold climates?
Bioretention functions year-round with appropriate cold-climate design features like freeze-resistant underdrains and cold-hardy native plants, though treatment efficiency may decrease during frozen conditions.
How long does it take for bioretention to drain after a storm?
A properly functioning bioretention system drains completely within 24-48 hours after typical storms, preventing mosquito breeding while allowing time for pollutant treatment.
Can I build bioretention myself or should I hire a professional?
Small rain gardens under 200 square feet can be DIY projects with proper planning, but larger bioretention systems require professional design to ensure proper sizing, grading, and compliance with local regulations.
What maintenance does bioretention require over time?
Bioretention needs annual plant care and weeding, mulch replacement every 2-3 years, sediment removal from inlets every 5-10 years, and occasional media replacement after 15-20 years if clogging occurs.
Related reading: bioretention and green stormwater infrastructure
- Bioswales: linear drainage alternative for driveways and property edges
- Stormwater management plan: coordinate bioretention with all your BMPs
- Rain gardens: the simpler cousin of bioretention for smaller yards
- Rain garden design guide: sizing, soil, and plant selection
- Percolation test: determine if you need an underdrain in your system
- Green infrastructure for homeowners: examples, costs, and rebates
- Rainwater harvesting 101: complement your bioretention with storage
- Green bank financing: low-interest loans for bioretention projects
Turn Runoff Into Rebates
Join Rainplan to access personalized data and discover sustainable solutions tailored to your specific site.