

You’ve seen the puddles. Every heavy rain turns your driveway into a small lake, and water rushes off your roof like a waterfall, pooling against your foundation or flooding your neighbor’s yard. Meanwhile, you’re watching your water bill climb as you irrigate landscaping that could benefit from all that free rainwater running away.
A rain garden captures runoff right where it falls, filters it naturally, and turns your drainage headache into something that actually looks good. Get the design right, and your rain garden handles that first inch of rainfall from your roof or driveway. It cuts flooding, supports pollinators, and slashes your irrigation costs. What matters most? Sizing, placement, and drainage that lets water soak in within 24 to 48 hours—no new problems created.
We’ll walk you through the complete design process—from calculating the right size for your property to picking plants that handle both wet and dry conditions. You’ll test your soil drainage, design overflow systems that work, and create planting zones that look intentional all year. We’ll also cover how to connect your design with local incentive programs that can help offset installation costs.
Key takeaways
- Size your rain garden correctly to prevent flooding: Use the formula of contributing area divided by 6-8 to capture runoff from your roof and driveway without overflowing during typical storms.
- Test your soil drainage before you dig: Water should drain within 24-48 hours from a 10-inch test hole, or you’ll need a different location or professional drainage system.
- Get significant financial help through local rebates: Rainplan’s property analysis identifies rebates and incentives that cover 50-75% of installation costs while calculating optimal garden size for your specific address.
- Choose native plants by moisture zones: Place water-tolerant sedges in the bottom, moderate plants on slopes, and drought-resistant flowers on edges to create a thriving garden year-round.
- Build proper drainage features to avoid mosquito problems: Install rock spillways for overflow and maintain level basin floors so water drains completely within 48 hours.
What a rain garden is and why it matters
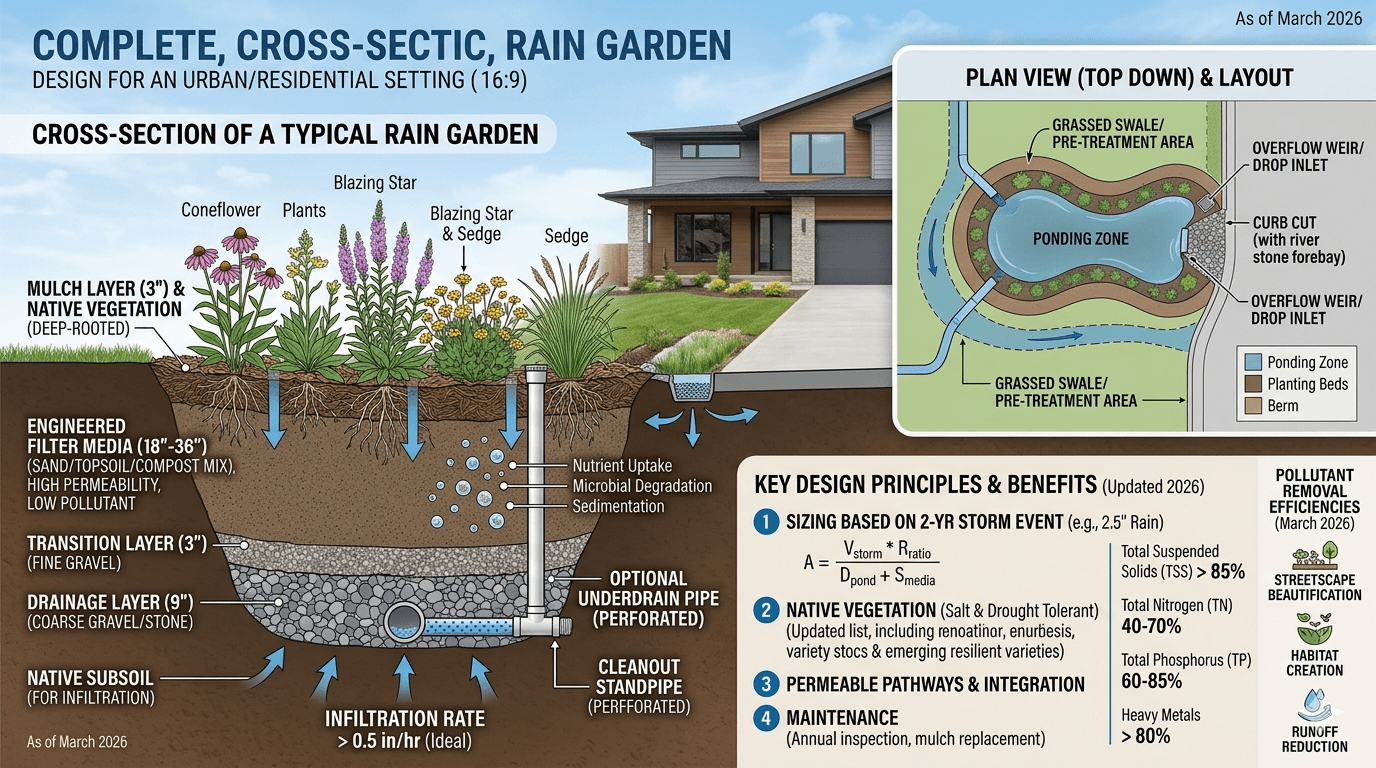
A rain garden is a shallow, planted depression that captures stormwater from your roof, driveway, and other paved areas. Picture a bowl-shaped garden bed—3 to 8 inches deep, filled with native plants—that holds water temporarily while it soaks into the ground. This simple feature turns runoff from a problem into something useful for your property and the local ecosystem.
Rain gardens protect your property and support the local ecosystem with real, measurable results. Unlike regular landscaping, these gardens manage water right where it lands:
- Flood prevention: Captures 30% more water than conventional lawns, reducing pooling and erosion around your foundation
- Water quality improvement: Filters out sediment, nutrients, and oils before they reach groundwater or storm drains
- Foundation protection: Directs water away from your home’s foundation, preventing moisture damage and basement flooding
- Habitat creation: Supports native plants and pollinators, adding ecological value and visual interest to your yard
A typical 200-square-foot rain garden captures runoff from a 1,000-square-foot roof during a 1-inch rainfall event. That’s approximately 600 gallons of water managed right on your property instead of overwhelming storm drains. Rainplan’s property analysis helps identify optimal locations and connects you with local incentives that can cover 50 to 75% of installation costs.
Key steps for building a rain garden
Building a rain garden means following a specific sequence—skip steps and you’ll deal with standing water, erosion, or dead plants. Each step builds on the last. Skip ahead and you’re looking at expensive fixes down the road. Follow this process and your garden will drain properly and thrive for years.
Step 1: Perform a simple soil perc test
Your soil’s drainage rate tells you if your chosen spot will work for a rain garden. Dig a hole about 10 inches deep, fill it with water, and observe how quickly it drains. If water disappears within 24 to 48 hours, your site suits a standard rain garden design.
The target drainage rate is at least 0.25 inches per hour. Slower drainage requires either choosing a different location or planning for amended soil with an underdrain system. This simple test keeps you from finding drainage problems after you’ve already installed everything.
Step 2: Mark your location and excavation area
Smart placement protects your home and keeps you compliant with local codes. Keep your rain garden at least 10 feet from foundations and 50 feet from wells. Call 811 at least 2 to 3 business days before digging to locate underground utilities.
Choose a spot where you can easily route water from a downspout or where surface runoff naturally flows. A gentle slope of 1 to 5% toward the garden location works well for directing water without causing erosion. Mark your perimeter with landscape paint or stakes before excavation begins.
Step 3: Add layers for drainage and soil health
Excavate to a depth of 6 to 9 inches, creating a level bottom across the entire basin. An uneven bottom creates permanent puddles that breed mosquitoes and stress plants. Use a long board and level to check your work throughout excavation.
For soils with moderate drainage, amend with 60% sand, 30% topsoil, and 10% organic compost. This ratio promotes infiltration while retaining enough moisture for plant roots. Heavy clay soils need a full bioretention mix with an underdrain pipe for proper function.
Step 4: Create an overflow or spillway
Every rain garden needs an escape route for water during heavy storms. Build a rock spillway on the downslope side using 2 to 4 inch diameter river stones. Position this overflow at your desired ponding depth to ensure water exits before overtopping the berm.
The spillway should direct excess water to a safe area away from foundations and neighboring properties. This feature stops erosion and protects what you’ve built when big storms hit.
Step 5: Begin planting and mulching
Space plants according to their mature size, typically 12 to 18 inches apart for perennials. Water deeply during the first growing season to establish root systems. Native plants establish faster and need less maintenance than non-natives.
Apply 2 to 3 inches of shredded wood mulch across the entire garden surface, keeping mulch away from plant crowns to prevent rot. Your local extension office can recommend varieties suited to your region’s climate and soil conditions.
How to size and place your residential rain garden
Size your rain garden right and it’ll handle your property’s runoff without overflowing during typical storms. Most municipalities design for a 1-inch rainfall event, which represents the majority of storms in most regions. Get the math right now and you won’t be paying for expensive fixes later.
Step 1: Measure your runoff area
Calculate the total impervious area draining to your rain garden, including roof sections, driveways, and patios. Use this formula: Garden area = Contributing area ÷ 6 to 8. The divisor depends on your soil type; use 6 for clay soils and 8 for sandy soils.
For a 1,200-square-foot roof area, your rain garden should be 150 to 200 square feet. Rainplan’s property analysis identifies contributing areas and calculates appropriate garden sizes based on your specific address and local rainfall patterns, taking the guesswork out of sizing.
Step 2: Determine optimal depth
A 6-inch ponding depth works for most residential applications. Deeper gardens increase excavation costs and can stress plants during extended wet periods. Calculate your garden’s volume using: Volume = Length × Width × Depth.
A 10-foot by 15-foot garden with 6-inch ponding depth holds approximately 56 cubic feet of water, or about 420 gallons. This capacity handles runoff from roughly 900 square feet of roof during a 1-inch storm.
Step 3: Map inflow and overflow paths
Trace the path water takes from your downspouts or surface areas to the garden location. Install a splash block or rock-lined channel at the inlet to slow water and prevent erosion. The slope from your water source to the garden should be 1 to 5% for proper flow without scouring.
Create gentle berms using excavated soil to direct water into the garden from multiple angles if needed. Your overflow path should lead to a lawn area, existing drainage swale, or other safe discharge point.
Choosing native plants for changing conditions
Rain gardens swing between wet and dry—sometimes in the same week. Pick plants that handle this range and your garden will thrive long-term. Plant selection varies significantly by region, so consult your local extension office or native plant society for species recommendations specific to your area.
The following table organizes your planting strategy by moisture zone to create a thriving, balanced garden:
| Zone | Water tolerance | Example plants | Percentage of garden |
| Bottom | 24 to 48 hours standing water | Sedges, rushes, iris | 40 to 50% |
| Transition | Moist to moderate | Bergamot, milkweed | 30 to 40% |
| Rim | Drought tolerant | Coneflower, grasses | 10 to 20% |
Bottom zone selection
Plants in the deepest area must tolerate standing water for 24 to 48 hours after storms. Sedges, rushes, blue flag iris, and cardinal flower thrive in these conditions. Place these species in the center and lowest points where water collects first and drains last.
Transition zone selection
The side slopes experience moderate moisture levels. Wild bergamot, swamp milkweed, and New England aster perform well in this zone. These plants handle occasional wet feet but don’t require constant moisture to thrive.
Rim zone selection
Garden edges stay drier and may experience drought conditions between storms. Purple coneflower, black-eyed Susan, and little bluestem grass provide visual appeal while tolerating dry periods. These plants create a natural transition between your rain garden and surrounding landscape.
7 actions to prevent flooding and standing water
Water that sits longer than 48 hours breeds mosquitoes and signals a drainage problem. These seven actions fix the most common rain garden failures and keep your garden working like it should. Each one solves a specific problem homeowners run into after installation.
- Use rock at inlets: Place 6 to 12 inches of river rock at water entry points to slow flow and prevent soil displacement
- Maintain a level basin floor: Check for settling after storms and add soil to any depressions that form
- Install proper berms: Build a 4 to 6 inch high berm on the downslope side using compacted excavated soil
- Keep overflow pathways open: Inspect your spillway monthly and remove leaves, debris, and sediment
- Remove sediment buildup: Clear sediment when depth exceeds 2 inches at inlet areas
- Refresh mulch regularly: Replace decomposed mulch annually with coarse, shredded wood mulch
- Inspect after heavy rains: Walk your garden within 48 hours of significant rainfall to check for issues
DIY tips for maintenance and long-term care
Once established, rain gardens need less maintenance than traditional landscaping. The first two years need the most attention while plants develop their root systems. After that, seasonal care keeps your garden healthy and working properly.
Seasonal weeding and pruning
Remove weeds before they set seed, especially during the first two growing seasons when your native plants are establishing. Cut back perennials in late fall or early spring, leaving 6 to 12 inches of stem height for winter wildlife habitat.
Deadhead spent flowers in summer to encourage continued blooming and maintain visual appeal. Focus your weeding efforts during spring and early summer when weeds compete most aggressively with establishing native plants.
Replenishing mulch and soil
Add fresh mulch each spring to maintain a 2 to 3 inch depth across the garden surface. If water pools on the surface rather than soaking in, your soil may be compacted.
Gently loosen the top few inches with a garden fork, being careful not to damage plant roots. Rainplan’s maintenance guides provide seasonal checklists tailored to your specific garden type and local climate conditions.
Replacing or dividing plants
Most perennials benefit from division every 3 to 5 years. Signs that plants need attention include yellowing leaves, poor growth, or failure to flower. Divide in early spring or fall when temperatures are moderate.
Share extras with neighbors interested in starting their own rain gardens, creating a network of green infrastructure in your community. This approach builds local resilience while reducing your maintenance costs.
Start your rain garden project today
Rain gardens manage stormwater while creating landscapes that look good and work hard—benefiting your property and the environment. Installation takes careful planning, but the long-term benefits are worth it. Your rain garden cuts flooding risks, protects water quality, and creates habitat for local wildlife. Plus, you might qualify for significant rebates.
Rainplan’s platform analyzes your specific property to identify optimal rain garden locations and appropriate sizing based on your roof area, soil conditions, and local rainfall patterns. The virtual assessment process connects you with local rebates and incentives that can offset installation costs significantly. Many programs cover 50 to 75% of rain garden expenses for qualifying properties, making this sustainable upgrade more affordable than you might expect.
Frequently asked questions
What should I do if my soil drains slower than 0.25 inches per hour?
If your soil drains slower than 0.25 inches per hour, you have three options: relocate to an area with faster drainage, install an engineered system with amended soil and an underdrain pipe, or choose a different stormwater solution like a dry well.
How much does a typical 200-square-foot rain garden cost to install?
A 200-square-foot rain garden typically costs between $600 and $3,000 to install, depending on soil conditions, plant selection, and whether you do it yourself or hire professionals.
Can I connect my rain barrel overflow to feed my rain garden?
Yes, you can direct rain barrel overflow to your rain garden, creating a two-stage water management system that captures initial roof runoff and manages excess water effectively.
When should I hire a professional instead of building a rain garden myself?
Hire a professional for rain gardens larger than 300 square feet, sites with steep slopes exceeding 12%, high water tables, or when an underdrain system is required for proper drainage.
Which local programs offer the highest rebates for rain garden installation?
Local stormwater management programs, watershed organizations, and municipal utilities typically offer the highest rebates, ranging from $2 to $10 per square foot for qualifying rain garden installations.
How do I prevent mosquitoes from breeding in my rain garden?
Prevent mosquitoes by ensuring your rain garden drains completely within 24 to 48 hours, maintaining proper soil drainage rates, and avoiding permanent standing water through regular maintenance.